Wednesday, October 12, 2011
Life Happens . . . A Lot
I know. I've been cheating you with blog posts. I have not posted every day. I promise, I will do some double posts, and make sure that there are 31. Yes, I'm going to count this one. Sorry. But look forward to an Acorn Squash Risotto, a Founding Fathers restaurant review, a rant from The Physicist about organic food, or what your great grandparents just called "Food", and my "Ode to a Kitchen Aid Mixer". I have the pictures for all these already, so I just need to find the time to write them. Ah, life.

Monday, October 10, 2011
Picadilla - Spanish for Awesomeness
 I have a problem with salad dressing. My problem is that salad dressing comes in large bottles. I like a variety of salad dressings, but I don't use large amounts, so I end up with a graveyard of expired, half filled bottles of dressing in my fridge door. My solution is to make my own, and Picadilla is one of my favorites. I first had it at Thanksgiving, when my godmother's daughter brought it. Creamy, garlicky, with the nuttiness of almonds, it was amazing. When I got married, I received the recipe as a shower gift, probably because I had been licking my salad plate at the last several Thanksgivings. Now, I share a version of that recipe with you.
Here's what you'll need:
1/4 cup Blanched Almonds
2 cloves Garlic
1/2 cup Olive Oil
2 tsp. Vinegar
2 tsp. Lemon Juice
Pinch of Salt and Pepper

This is going to be super easy to make. Just watch. Throw the almonds and garlic into a food processor.
 Pulse until finely ground. Pour the olive oil in, in three or four parts, pulsing in between pours until fully incorporated.
 Add the rest of the ingredients, and pulse until smooth.
 That's it. It shouldn't have taken you more than 5 minutes. You now have a Spanish salad dressing that is pure deliciousness. You can put it in an airtight container and store it in the fridge for at least a couple weeks. When using it from the fridge, make sure you leave time for it to reach room temp, because the olive oil sometimes solidifies when chilled. And it's totally okay to lick the plate.
Sunday, October 9, 2011
Seven Years of Love (and Food)

Seven years ago today, this Girl married her Physicist. When planning our wedding, the food and cake took precedence over a lot of other details (I may have shocked the florist by saying "It's a fall theme, you're a professional, I'm sure whatever you do will be fine."). And, when deciding on the food and cake, The Physicist was an active participant.
A reception is the first dinner party you ever throw as a married couple, and it has practically everyone you know and care about at it. We went to a tasting at our venue, and were overjoyed that everything we had was amazing. But this led to other problems: If everything is good, what do you serve? I think we were up to 2am, agonizing over the possibilities when it hit us what we had to serve. Our guests joined us in a traditional Thanksgiving meal, turkey and all the trimmings, a month and a half early. I think the sensory memory associated with Thanksgiving, really helped us set the tone for the day.
But, I think the aspect we were most excited about was The Cake. We had set up several appointments for cake tastings . . . and cancelled them after the first one. After that first forkful of Konditor Meister cake, we knew we had found our bakery. Each layer was a different flavor: chocolate with raspberry filling, pumpkin with pumpkin apricot mousse, apple spice with maple mousse, and the top was tiramisu. When we decided to add a fourth layer of cake, The Physicist even wrangled a second cake tasting, "to help decide on the flavor" (which we had already picked).
We have wonderful memories of that day, and we believe the food and the cake played a big part in making that day a success. I think that theme has spilled over from our wedding and into our marriage. Food and cake play a big part in our lives, and sometimes the food is great, and sometimes it's a disaster. But, as the years have gone by, our menus have become more complex, a little more sophisticated, we've learned what works and what doesn't. And overall, things just get better and better.
P.S. I know I missed a couple days, but we were celebrating our anniversary in DC, and the hotel wanted $10 a day for internet. I'll do double posts Monday and Tuesday to make it up to you. :)Thursday, October 6, 2011
Like Pie? Your New Favorite Word is: Galette
 You're thinking, "I'm pretty sure my favorite word is still 'swizzle stick'.", but trust me, "galette" is going to be at least in the top ten. I've previously posted my apple pie recipe, which, though delicious, makes a lot of pie, takes a lot of time, and really isn't practical for a weeknight. "Galette" is a word that the French use to describe a lot of flat desserts, but this recipe is for a flat, one crust sorta pie. And if you use ready made pie crusts, it's ridiculously easy to throw together.
You'll need:
 2-3 Tart Baking Apples, like Granny Smith
2 Tbsp. Sugar
1/4 tsp. Cinnamon
1/4 tsp. Ground Ginger
Pinch Clove
1 Tbsp. Butter
 Preheat your oven to 375 degrees. Line a baking sheet with some parchment paper. Yes, you have to. You can find some in the baking aisle of your grocery store. Then unroll your ready made pie crust. Yup. It's that easy. You didn't even need a pie plate!
 Now, peel, core, and slice your apples. In this one, the apples show, so it helps if you're careful and make nice even slices, while keeping the apple half together, as pictured to the left. You'll see in a second why.
 Try to place them artfully, kinda curling them around each other, on top of the pie crust, keeping a 1 and a half margin around the edge. This step doesn't require perfection, just do your best, and at the end of the day, remind yourself that this is a "rustic" dessert. I only ended up fitting two and a half apples on there, so how much apple you use depends on the crust size and size of your apples.
 Okay, mix your sugar and spices together, and sprinkle them evenly over the apples. Then dot the top with butter.
Now, fold over the edge of the crust. To keep the fold secure during baking, and protect the crust, fold some strips of aluminum foil around the edge, just covering the crust, not the apples.
Bake in the oven for 40 minutes, then remove the foil and bake an additional 10-15 minutes, until golden brown.

And, voila! It's smaller than pie and only makes about 6 servings, so it's perfect for couples or small families. It takes about 20-30 minutes to put together (depending on how fast you peel and cut apples), and bakes in less than an hour. And, like my pie, it tastes like apples. :D
Wednesday, October 5, 2011
Roast Chicken: Or How I Learned To Get Past My Fears and Touch Raw Poultry
 The Physicist and I have been enjoying roast chicken since the early years of our relationship. But my secret shame was that I was not the one making it. I could cook a mean boneless, skinless chicken breast, but when it came to roasting a whole bird, that was his territory. The thought of wrangling a whole bird, removing giblets, washing it out, patting it dry . . . *shudder*. Just not something I thought I could handle. So, at almost 7 years of marriage, I decided it was time for me to get over this fear. I'd learned to grill, why not this? The Physicist did assist me with the prepping of the bird, and I do wear food grade vinyl gloves the whole time, but I have hope that one day, I will be able to reach into that bird and pull out the giblets myself. Just not today. But here's how to roast a chicken.
 You'll need:
3-4 lbs. Whole Chicken, giblets removed, rinsed out and off, patted dry
Salt and Pepper, in a small bowl
1 Lemon, halved
1 Head Garlic, cut in half crosswise
1 Bunch Fresh Herbs; Sage, Rosemary, Thyme
2 Tbsp. Olive Oil, in a small bowl
1 Onion, cut into wedges like an apple

Preheat the oven to 475 degrees. Place the chicken, breast side up, into a roasting pan, or oven safe pot big enough to hold it. Tuck it's tiny little arms under it. (The Physicist: "They're wings! Jeez!") Salt and pepper the cavity, then shove both halves of the lemon, both halves of the garlic, and the bunch of herbs in. Cram it all in there, you can do it. Close the little skin flaps over it, and secure 'em with toothpicks. Brush the whole bird with the olive oil.
 Then massage the salt and pepper all over, into the skin and squeeze all the onion wedges around the bird.
The whole thing should look like the picture to the left. ("You can take off the gloves now.")
At this point, you can put it in the oven, and set a timer for about an hour and fifteen minutes. It might need more time than that, but a food thermometer into the thigh should read 160 degrees when it's done.
 And it should look like this! This skin should be crisp and all golden, and the smell should be mouthwatering and slightly herbaceous. Fluid, when it's pierced with a fork, should run clear.
We did it! We roasted a chicken! We can do anything! (Except remove the giblets.)
Tuesday, October 4, 2011
Breakfast of Champions
 I am about to tout the virtues of a health food, so if you find that sort of thing offensive, avert your eyes.
About a year ago, I was looking into ways to try and eat healthier and came across a whole bunch of articles waxing poetic about Wheat Grass. I looked further into it, and though not a lot is scientifically proven about it, it's definitely not bad for you. The only thing is that it cannot be heated, or whatever good it does you is lost.
So I picked up a single serving package of Berry flavored GREENSuper Food at Whole Foods and decided to experiment. While checking out, the cashier asked if I had had wheat grass before. I told her I hadn't, and asked what I should stir the powder into. "I like mine mixed with water. You can really taste the swampiness." THE WHAT?!?! The look of mortification must have been clear on my face, because the girl who was bagging our groceries held up my chocolate soy milk, emphatically pointing to it, while mouthing the words "Use this."
For the last year, 4-5 days a week, pictured above is what I have for breakfast. Does it taste a bit like lawn clippings in chocolate milk? Yes. Do I feel better on days when I have that for breakfast rather than something like delicious banana pancakes? *sigh* YES. There is a notable difference in my energy levels, I feel healthier, and my digestion is more, shall we say, "regular".
Now, using soy milk cuts down on how thick the smoothie tastes, as soy milk has a thinner consistency than milk. Chocolate DEFINITELY masks a LOT of the grass flavor. The powder does have to be whisked into the soy milk, or it clumps, and it should be consumed quickly after it's been whisked. I usually get it down in three gulps. I know, this has not been the most glowing recommendation, but I do suggest you pick up some packets and some soy milk, and give it a try for a week. You might think it's worth it.
Monday, October 3, 2011
BAH-nana NUT! Pancakes For Breakfast
 When I was little, I could usually bribe my father into making pancakes on Saturday or Sunday morning. (I usually did this by bringing him and my mother coffee in bed. I was the only second grader who knew how to brew coffee.) If there were some old, black bananas in the house, my father would sing "BAH-nana NUT Pancakes for breakfast - BAH-nana NUT pancakes today!" to the tune of Mahna Mahna from the Muppet Show. The pancakes never had nuts, but it fit the song better. And the banana pancakes were always delicious!
 The Physicist does not like the typical bananas you find in the store, which are the Cavendish variety. He thinks they taste "too banana-y" (that's a technical term). But, my fears of never being able to enjoy banana pancakes with him were averted when we found baby (or mini) bananas. The Physicist absolutely *loves* to snack on these, and by the end of the week, usually some have turned the overripe black color that means it's time to mash them into the bottom of a mixing bowl and heat up the griddle.
 I am not going to give you a recipe for pancakes. I make mine from a mix (Jiffy!), and have found that most people already have a favorite pancake batter. I'm not here to mess with your pancakes.
I will give you a few tips though.
1) Pancakes are for anytime. These were our dinner. :)
2) Mix-ins are your friend. Adding fruits, nuts, chocolate chips, or even bacon can liven up your pancakes. We had some chocolate chips in our banana pancakes.
3) Don't pour the batter on your griddle until it's hot enough that water drops dance (not just sizzle, not evaporate, but a skittering dance) on the surface.
4) Don't flip the pancake until bubbles form in the middle (see picture above). They don't have to be fully formed bubbles if you like your pancakes a lighter color, but they do have to at least be forming.
Sunday, October 2, 2011
Hot Bar-B-Que!
 The last days of our grilling season are here, so today I give you three delicious BBQ sauce recipes The Physicist and I created to celebrate his birthday over the summer. We like to have a variety of sauces when we have company, as our friends have a variety of tastes. Some like it sweet, some want it super spicy, and some want it tangy. We usually don't tell our guests who made which sauce, and then ask which one they liked best. Unfortunately for bragging rights, it's usually an even split.
The Physicist's Raspberry Melba BBQ Sauce
You'll need:
7 oz. Raspberry Preserves
2 Tbsp. Apple Cider Vinegar
1/8 tsp. of Onion Powder
1/4 tsp. Chili Powder
1/8 tsp. Cloves
1/4 tsp. Cayenne
1 1/2 tsp. Worcestershire Sauce
1 tsp. Horseradish
2 Tbsp. Honey
Stir and simmer all the ingredients in a small saucepan over medium heat until thick, about 15 minutes. That's it. This one is for those looking for a fruity flavor and just a little spice.
The Girl's Sweet & Spicy BBQ Sauce
You'll need:
1/2 cup Tomato Puree
1/2 cup Brown Sugar
2/3 cup Orange Juice
1 tsp. Thai Red Curry Paste
1 tsp. Sriracha
3 tsp. Hoisin
1/2 tsp. Ground Ginger
1/2 tsp. Cayenne
2 Tbsp. Maple Syrup
2 Tbsp. Lemon Juice
Stir it all together and simmer it over medium heat for 15-20 minutes, until nice and thick. This sauce has a lot of heat, particularly slow heat that sneaks up on you, but it balances nicely with the sweet.
The Girl's Mild Mustard BBQ Sauce
1/2 cup Tomato Puree
1 Tbsp. Tomato Paste
7 Tbsp. Yellow Mustard
1/4 cup Brown Sugar
1/8 tsp. Chili Powder
1 Tbsp. Lemon Juice
1/2 tsp. Onion Powder
1/4 tsp. Curry Powder
1/2 tsp. Garlic Powder
1/8 tsp. Wasabi Powder
1 tsp. Horseradish
2 Tbsp. Maple Syrup
1 Tbsp. Apple Cider Vinegar
1 tsp. Paprika
Same thing, stir it all together and simmer over medium heat until the flavors all meld and it thickens up a little, about 10 minutes. This one is VERY tangy and mustard-y, but light on spice.
Saturday, October 1, 2011
Blogging, Blogging, Blogging!
It's that time of year again. Actually, I'm a month earlier than last year, but apparently October *is* NaBloWriMo. So, I will attempt to blog every day in October. This time, I will be writing some restaurant reviews, talking about foods for different moods, and some general food topics (for example, the process I go through when I invent a recipe), in addition to blogging my recipes and my favorite kitchen gadgets. Maybe The Physicist will finally post about his home brew (I know that he has a hard cider planned!) If there is a topic you'd like me to write about, feel free to ask. I'm looking for ideas!
Monday, June 13, 2011
Almond Strawberry Quick Bread
 The Physicist LOVES to garden. Because of this, every summer, we tend to have a LOT of produce. Right now, I'm in the thick of our strawberry season. Last week, he picked about 7 pounds of strawberries. I'm giving them away, having them at every meal, making jams and ice creams to store them. And I'm making Almond Strawberry Quick Bread. I found a recipe online (for Walnut Strawberry Bread), decided I didn't like half the ingredients, changed it around, and made it. Then I decided it had WAY too much sugar! (Strawberries are already sweet, people!) It was like eating candy. So I changed it again, cutting WAY back on the sugar. Now, the bread tastes like strawberries. And you know me, I like things with fruit in them to taste like the fruit. :)
You'll need:
1/2 cup Almond Flour (finely ground almonds if you can't find almond flour, it's the same thing)
1 1/2 cups All-Purpose Flour
2/3 cup Sugar
1/2 tsp. Baking Soda
1/2 tsp. Salt
1/4 tsp. Cinnamon
1/2 tsp. Ground Ginger
1 Tbsp. Lemon Zest
2 Eggs
1 1/4 cups Mashed Strawberries (10 oz.)
1/2 cup Vegetable Oil
Preheat your oven to 350 degrees and grease and flour a 9" x 5" bread pan. (I like the Pam Baking for this.)
In a medium bowl whisk together the almond flour, flour, sugar, baking soda, salt, cinnamon, and ginger. Set aside. In a large bowl, mash those strawberries if you haven't already, and then add the zest, eggs, and oil, whisking that all together. Now add your dry to your wet and make sure they're combined. It should be pinkish-purple.
Pour into your bread pan and bake for 55-60 minutes. Don't take it out until a toothpick inserted in the middle comes out with no goo. Cool in the pan on a wire rack for 15 minutes, then take it out of the pan and let completely cool on the rack for an hour. Slice and enjoy!

Wednesday, June 8, 2011
Chocolate Frosting - 6 Inch Style
Really, what goes better with yellow cake than chocolate frosting? It's a classic! This combo is The Physicist's favorite. Once again, this is adapted from Martha.
You'll need:
1/2 pound Really Good Chocolate (Dark or Semi-Sweet)
3 Tbsp. Dutch-Process Cocoa Powder
3 Tbsp. Boiling Water
1 1/2 sticks Unsalted Butter, Room Temp
1/4 cup Powdered Sugar
Pinch of Salt
Okay, first we melt the chocolate by placing it in a heat proof bowl (like Pyrex), over, but not touching, some simmering water in saucepan. This is pretty much making your own double boiler. Turn off the heat, and stir until the chocolate melts completely. Set this aside and let cool to room temp. While your waiting, combine the cocoa and the boiling water until the cocoa is dissolved. (It is important that both the chocolate and the cocoa mixture cool to room temp, or you'll melt your butter!)
Once everything is room temp, place your butter, powdered sugar, and salt in the mixing bowl of your electric mixer and beat until light and fluffy with the paddle attachment for 3-4 minutes. (No mixer? Get your wooden spoon and work those arms!) Add the melted chocolate, beat until combined. Then add the cocoa mixture. Scrape down the sides, and beat until smooth.
You'll need:
1/2 pound Really Good Chocolate (Dark or Semi-Sweet)
3 Tbsp. Dutch-Process Cocoa Powder
3 Tbsp. Boiling Water
1 1/2 sticks Unsalted Butter, Room Temp
1/4 cup Powdered Sugar
Pinch of Salt
Okay, first we melt the chocolate by placing it in a heat proof bowl (like Pyrex), over, but not touching, some simmering water in saucepan. This is pretty much making your own double boiler. Turn off the heat, and stir until the chocolate melts completely. Set this aside and let cool to room temp. While your waiting, combine the cocoa and the boiling water until the cocoa is dissolved. (It is important that both the chocolate and the cocoa mixture cool to room temp, or you'll melt your butter!)
Once everything is room temp, place your butter, powdered sugar, and salt in the mixing bowl of your electric mixer and beat until light and fluffy with the paddle attachment for 3-4 minutes. (No mixer? Get your wooden spoon and work those arms!) Add the melted chocolate, beat until combined. Then add the cocoa mixture. Scrape down the sides, and beat until smooth.
Tuesday, June 7, 2011
6 Inch Yellow Cake - The Recipe
So, I have recieved a request to post an actual recipe for a 6 inch cake. (Yes, I do take requests!) This one is adapted from Martha Stewart's Yellow Butter Cake. The only special equipment you'll need is 6 inch cake pans.
You will need:
1 stick Unsalted Butter (Room Temperature)
3/4 cup All-Purpose Flour
3/4 cup Cake Flour
1 1/2 tsp. Baking Powder
1/4 tsp. Salt
7/8 cup Sugar (or 3/4 cup + 2 Tbsp.)
2 Eggs
1 Tbsp. Vanilla Extract
5/8 cup Milk (or 1/2 cup + 2 Tbsp.)
Preheat the oven to 350 degrees. Butter two 6 inch pans, line the bottoms with parchment circles, butter the parchment, and flour. In a medium bowl, sift together both flours, baking powder, and salt.
Fit your electric mixer with the paddle attatchment (or decide to give your arms a workout and get your wooden spoon and big mixing bowl ready). Cream the butter and sugar together until light and fluffy, about 3-4 minutes. Beat in the eggs, one at a time. Add the vanilla extract. Take the mixer down to low speed and add the flour mixture in three parts, alternating with the milk, beginning and ending with the flour. Make sure every addition is completely combined before adding the next.
Divide the batter between the two cakes pans and smooth the tops with an offset spatula. Bake for 30-35 minutes, until a toothpick inserted in the center comes out clean. Transfer pans to a wire rack for 20 minutes to cool, then invert the cakes, remove the parchment, turn 'em right side up, and let them cool completely.
Trim the tops and frost 'em. I'll try and post a 6 inch chocolate frosting recipe tomorrow.
You will need:
1 stick Unsalted Butter (Room Temperature)
3/4 cup All-Purpose Flour
3/4 cup Cake Flour
1 1/2 tsp. Baking Powder
1/4 tsp. Salt
7/8 cup Sugar (or 3/4 cup + 2 Tbsp.)
2 Eggs
1 Tbsp. Vanilla Extract
5/8 cup Milk (or 1/2 cup + 2 Tbsp.)
Preheat the oven to 350 degrees. Butter two 6 inch pans, line the bottoms with parchment circles, butter the parchment, and flour. In a medium bowl, sift together both flours, baking powder, and salt.
Fit your electric mixer with the paddle attatchment (or decide to give your arms a workout and get your wooden spoon and big mixing bowl ready). Cream the butter and sugar together until light and fluffy, about 3-4 minutes. Beat in the eggs, one at a time. Add the vanilla extract. Take the mixer down to low speed and add the flour mixture in three parts, alternating with the milk, beginning and ending with the flour. Make sure every addition is completely combined before adding the next.
Divide the batter between the two cakes pans and smooth the tops with an offset spatula. Bake for 30-35 minutes, until a toothpick inserted in the center comes out clean. Transfer pans to a wire rack for 20 minutes to cool, then invert the cakes, remove the parchment, turn 'em right side up, and let them cool completely.
Trim the tops and frost 'em. I'll try and post a 6 inch chocolate frosting recipe tomorrow.
Monday, June 6, 2011
Peanut Butter Oatmeal Chocolate Chip& Mini Reese's Cup Cookies
 So, It's a long title. But it's a delicious cookie. Ever since Reese's started making the mini unwrapped, I knew I had to put it in a cookie. But, I've been on this whole "let's try and be healthier" kick, so I made the cookies oatmeal. (Note: making them oatmeal cookies is just pandering to my guilt. I don't think these are really healthy cookies, just the oatmeal makes them seem that way.)
You will need:
2 1/2 cups All-Purpose Flour
1 tsp. Baking Soda
1/2 tsp. Salt
1 1/4 cups Brown Sugar
1/2 cup Sugar
1 cup Butter
1/4 cup Peanut Butter
2 Eggs
1 Tbsp. Vanilla Extract
3 cups Oats (I use Quaker Old Fashioned)
2 cups Chocolate Chips
1 package Reese's Mini Unwrapped (8oz.)
Preheat your over to 375 degrees. Whisk together flour, baking soda, and salt in a medium bowl, and set aside. In a large mixing bowl, cream together brown sugar, sugar, butter, and peanut butter. Add the eggs, one at a time, and add the vanilla extract. Gradually add the flour mixture. Now, if your using an electric mixer, stop at this point, because adding the oats will kill it. Stir in the oats by hand (work those muscles!) and then add the chocolate chips and peanut butter cups. Scoop out dough in tablespoons onto an ungreased cookie sheet. Try to make sure there is at least one peanut butter cup in every cookie. Bake for 8-10 minutes. Let cool and enjoy.
Monday, January 17, 2011
Failcake
 This is a Red Velvet Cake. I swear. The Physicist says it tastes great. But I decided to post this for all the people out there that have screwed up a cake. I do it too. It's okay. We just move on.
Okay, so I wasn't so ready to move on. This is the first cake in several years that just wouldn't let go of the pan. In my defense, I've never made Red Velvet cake before. I *did* tweak the recipe (which in hindsight, was a terrible idea). When The Physicist came home, I showed him the pieces that were supposed to be the cake, and then told him I was going to throw it out. He said, "Frost it." So, I did. He's enjoying right now.
On the bright side, I also made cupcakes with the other half of the batter. They turned out lovely.

P.S. I've decided that a post once a month is probably more realistic. :)
Saturday, December 11, 2010
Baked Brie - A Holiday Must!

Whether you need something to bring to a Holiday Party, just want a festive appetizer, or a romantic dinner for two, a baked brie is always a wonderful choice. All wrapped up, just like a present, it's great for the holidays, or really, anytime. The Physicist and I make this year round, and I just change my stuff for the top (cutting out little leaves in the fall, or flowers in the spring). It's easy enough to pull together on a weeknight, and always dazzles.
 You'll need:
1 Puff Pastry Sheet, thawed
1 Wheel of Brie
2-3 Tbsp. of Jam or Preserves or Fruit Butter
1-2 Tbsp. Sliced Almonds (optional)
1 Egg
 Preheat oven to 400 degrees
On a cookie sheet (or a foil covered cookie sheet), lay out your sheet of puff pastry, and dock it. Docking is lightly pricking the entire surface with a fork. It's to keep the puff pastry from over puffing in the oven.
With a spoon, smear your fruit preserve in a circle in the center of the dough. I used Marion Blackberry here, but pumpkin or apple butters, raspberry, strawberry, or whatever is also delicious. I try to think "seasonal".

Sprinkle the almonds over your jam circle. You don't need the almonds, but I find them a nice touch. You can also use dried fruit, or nothing at all.

Now, slap your brie wheel right down on top of the preserves. There really isn't a right side up.
 Now, wrap up the brie like a present, folding in the corners and sides. So, as not to make a thick pile of dough, tear off some of the corners. You can use them to decorate in the next step.
 Once it's all wrapped up, flip it over, so the smooth side is up.
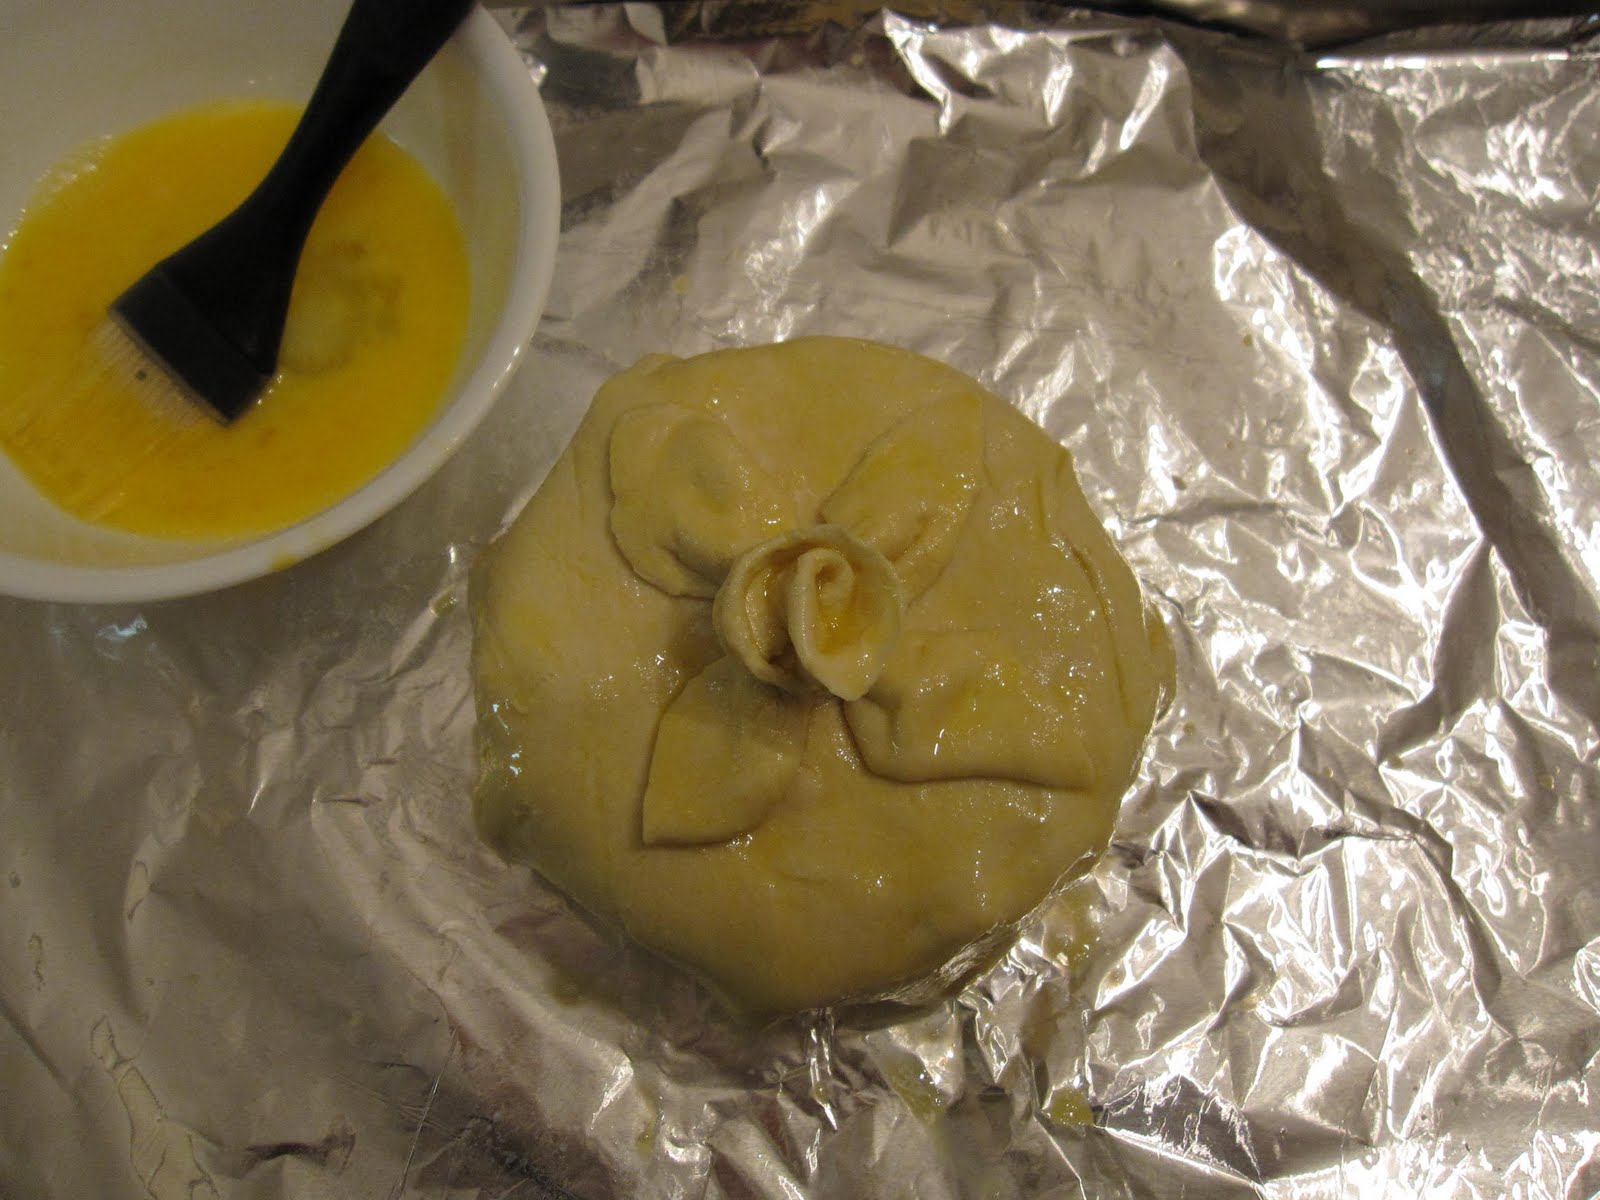
Use your extra pieces of dough to decorate the top. I got carried away, and somehow managed to make a rose. You don't have to do that. Use little cookie cutters, or just make a bow shape with your extra dough, or, if you're ambitious, make some holly leaves and berries. Even a pile of little pieces of dough on top can be lovely.
Beat an egg, and brush it over the top and sides of the pastry.
Bake in the oven for about 20-30 minutes, until golden brown.


While it's baking, start prepping what you dip in it. You can just serve it with crackers, but The Physicist and I like to serve it with fruit. We slice up a Granny Smith Apple, and wash up some raspberries, but any fruit, or bread, or whatever you'd like to dip in cheese is good.
This is what it looks like when it comes out of the oven. All golden brown and lovely. Carefully lift it off with a spatula and set it down on a plate.
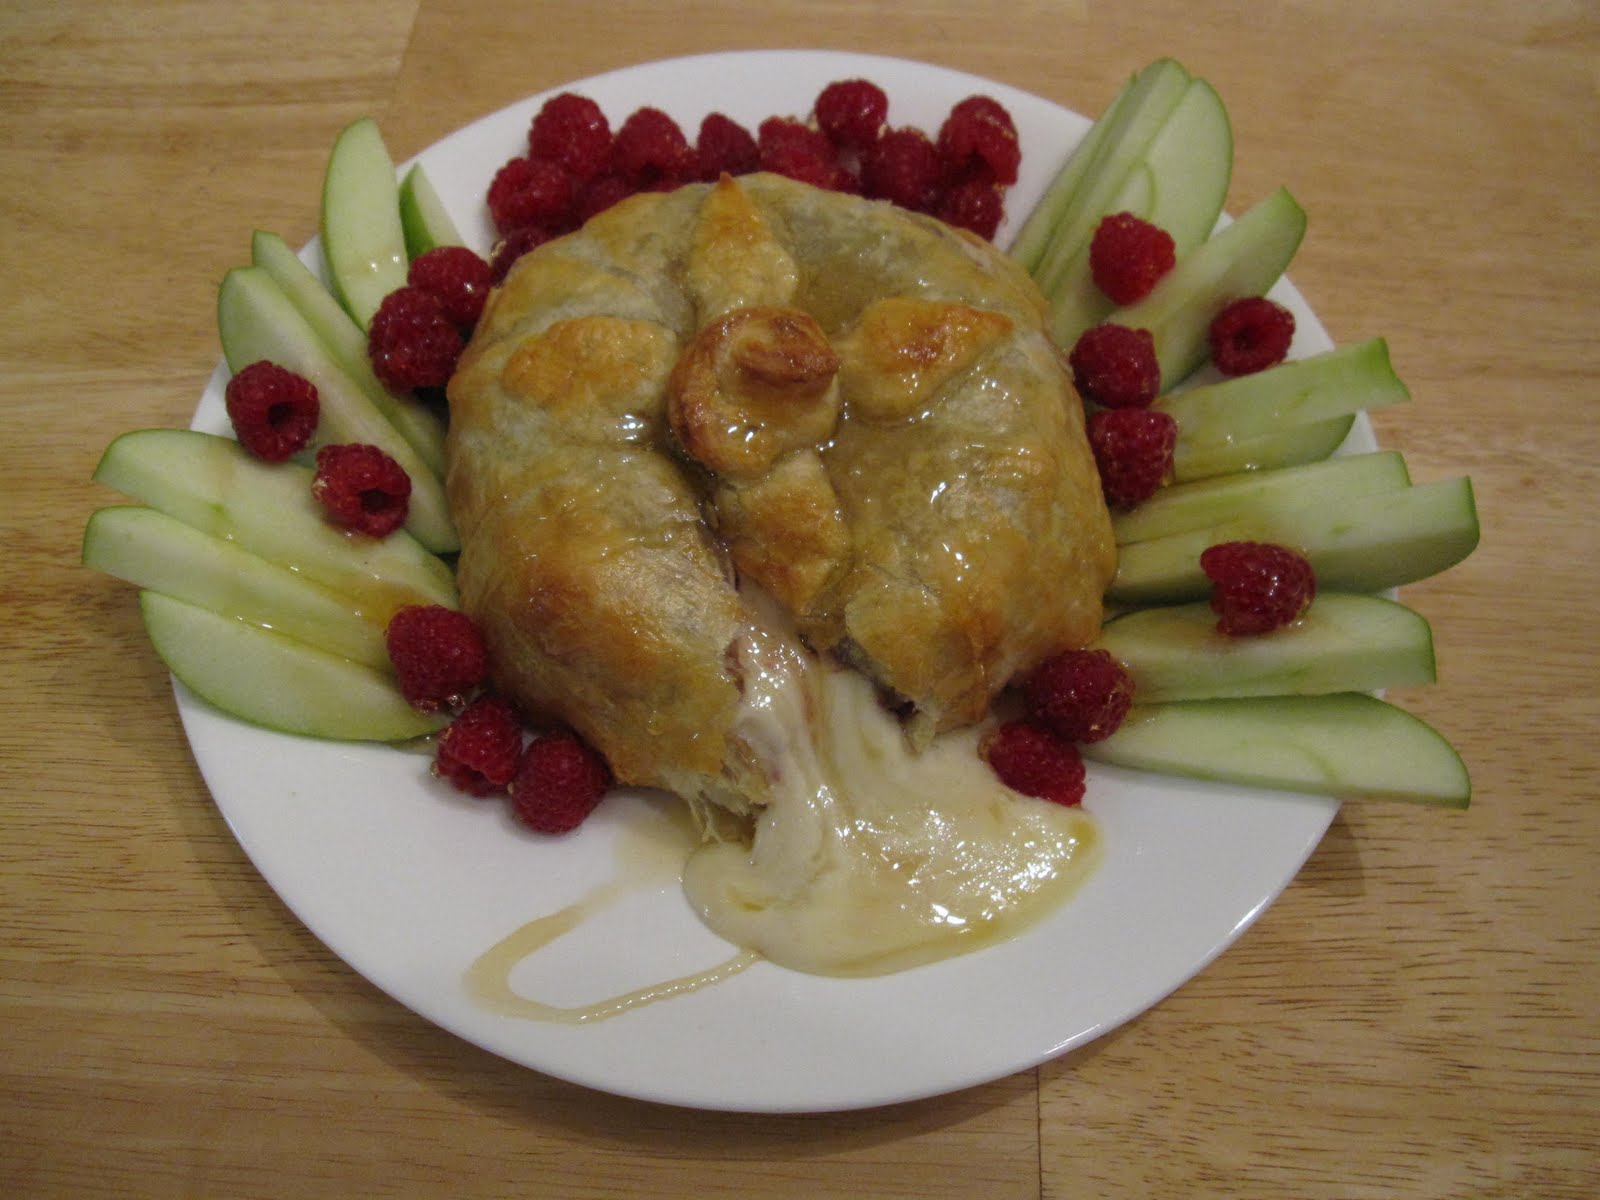 We like to drizzle the whole thing with honey when serving it with fruit, because it just adds another decadent level.
 Wait until you're serving it to cut into it, because the moment when the knife goes in, the warm, velvety, melted cheese starts pouring out in it's gooey glory. And no one wants to miss that moment, so make sure everyone is watching.
Wednesday, December 1, 2010
Yeah . . .
So, I didn't make it. My first NaBloWriMo was a bust. I have a camera full of photos, for posts I didn't make. Life happened. BUT . . . I will make those posts. I'm hoping to at least post once a week. I'm hoping that most of those posts will be about food. The Physicist plans on blogging about how to make a roast bird, and I want to share my roasted garlic cream cheese redskin mashed potatoes recipe. December will probably bring some posts about my intense holiday baking and maybe even a how-to on my baked brie! Here's hoping you hear from me soon.
Sunday, November 21, 2010
Why the 6 Inch Cake is Awesome

A 6 inch cake is the perfect size to make cake accessible on more than just special occasions. Unless you have 12 or more people in your family, a 9 inch cake just doesn't make sense. It's too much cake. Even if you have cake every night, you'll never finish the cake before it goes bad. And if you do, well . . . you shouldn't be eating that much cake.
This is the finished cake (see picture). I went a little nuts with the fondant flowers, but I just got caught up in the spirit of Fall. But, back to my topic.
A 6 inch cake is a more reasonable size for families of 2-5 people. Even for larger families, a 6 inch cake may provide more options, by having two 6 inch cakes of different flavors, because there is no way that a family of 12 all wants the same flavor of cake (go ahead, prove me wrong). As The Physicist points out, "it already has a higher frosting to cake ratio, if you're into that sort of thing". Because they are smaller, they are less work to make. It's easier to experiment with flavor combinations when you aren't committing to a giant cake of licorice pineapple (I don't recommend licorice pineapple). And lastly, they're just so darn cute! Seriously adorable!

Here is an aerial shot of my cake, so you can see more of the fondant flowers. I made roses, calla lilies, mums, hypericum berries, and kinda generic little yellow flowers. This was a first attempt at painting the fondant, after I shaped the flowers and leaves, to give them more depth. Ain't half bad, if I do say so myself.
Swiss Meringue Buttercream: Pumpkin Style

I'm usually a huge fan of butter, but smearing your cake with butter mixed with powdered sugar . . . kinda seems gross to me. This is Pumpkin Swiss Meringue Buttercream. It's not like regular buttercream. It's silkier, and lighter tasting, because of the meringue replacing most of the butter. Sure, you have to make meringue, which takes a little longer, but the end result is totally worth it. Trust me.

I use Martha Stewart's Swiss Meringue Buttercream recipe. Well, the Baking Handbook version of it, which is easier to halve for the 6-inch cake (but the link recipe is excellent too). I highly recommend purchasing Martha Stewart's Baking Handbook, because it's an amazing reference. To make the buttercream pumpkin, I added about 1/4 cup of canned pumpkin to the finished buttercream.
This (see picture) is where we left off with the syrup. I have used some of my buttercream as the filling between the cakes.

Now, a word about frosting a cake. I take about a third of my frosting into a separate bowl, to be my crumb coat. "What's a crumb coat?" you ask. Excellent question. It's a first coat of frosting, to make sure there are no crumb in your final coat of frosting. If you've ever painted, think of it as primer. You separate a third of your frosting, because crumbs might get into your bowl. It happens. It's why you're doing this. It doesn't have to pretty (see picture), but this is your chance to even up your sides and smooth out your top. Once it's on, refrigerate the cake for about 10-15 minutes.
 After 10 minutes, you'll notice your crumb coat is kinda hard. Good. Then it won't smoosh into your final coat, transferring crumbs. Now it's time for the final coat, and you'll notice how much easier it is to frost because of the crumb coat. If you're going for a smooth look, dipping your spatula in a glass of water really helps. If you just don't think you can manage a smooth look, just frost it like I recommend in the Chocolate Raspberry Cake.
 Then it's time for finishing touches. I . . . am not good at piping frosting. Really not good. So I just pipe little circular blobs of frosting around the top and bottom edges. It's easy. It looks pretty okay. And I add fondant stuff to it, so you don't notice how bad my piping is anyway. You'll see that in the next post.
 After 10 minutes, you'll notice your crumb coat is kinda hard. Good. Then it won't smoosh into your final coat, transferring crumbs. Now it's time for the final coat, and you'll notice how much easier it is to frost because of the crumb coat. If you're going for a smooth look, dipping your spatula in a glass of water really helps. If you just don't think you can manage a smooth look, just frost it like I recommend in the Chocolate Raspberry Cake.
 Then it's time for finishing touches. I . . . am not good at piping frosting. Really not good. So I just pipe little circular blobs of frosting around the top and bottom edges. It's easy. It looks pretty okay. And I add fondant stuff to it, so you don't notice how bad my piping is anyway. You'll see that in the next post.
Thursday, November 18, 2010
Syrup: Not Just For Pancakes

Yup, we're back to making the cake. And, yes, the topic is syrup. Not maple syrup (though it could be), but a sugar/water/flavor combo to make your cake spectacular. It's easy, it adds extra flavor, and it keeps the cake moist. Come on, if it adds all that, why wouldn't you put syrup on a cake?
Now, you can make a simple syrup, by boiling sugar and water in some ratio, and adding a flavor (The Physicist does this, because he loves doing things the hard way), but I have a much easier method, with much more flavor.
 You will need (for a 6 inch cake):
2 Tbsp. Jam or Preserves
3 Tbsp. Liquid
Saucepan
Pastry Brush
Pictured are some of my favorite combos: Ginger Preserves with Amaretto, Raspberry Preserves with Rose Water, and Lemon Curd with Orange Blossom Water. I like the ginger for fall cakes, the raspberry for chocolate or spring cakes, and the lemon for citrus or summery cakes. You can make your own combination, and just go with what flavors sound great to you.

For our Spice Cake, I'm using Ginger Preserves and Amaretto. Put your jam and liquid into a saucepan, and heat over medium low heat until the jam melts into a syrupy consistency (see first picture).
Cut off the tops of your cakes, and using a pastry brush, mop the top surfaces of the cake with the syrup (see picture).

Now, when you add your filling and stack your cakes, you should have layers from bottom to top: cake, syrupy side of cake, filling, syrupy side of other cake, other cake (see picture).
If you are making a regular sized cake, just double the recipe.
So, next time you're making a cake, give a syrup a try. I promise, you'll like the results.If you are making a regular sized cake, just double the recipe.
Wednesday, November 17, 2010
Extracts & Flavorings

I'm going to pause our cake assembly, to take a moment to discuss extracts and flavors. As you can see, I have a bit of a collection (this isn't all of it), and I'm still collecting more. Flavorings can take a baked good or candy to the next level. Homemade marshmallows are fantastic, but homemade POMEGRANATE marshmallows?!?! Out of this world.
Now, you might think, "Why can't I just use pomegranate juice in my candies or cakes? Why the flavor/extract?" Well, baking and candy making are . . . science. Acids, bases, exact temperatures, exact ratios, are all part of baking and candy making. It's kinda funny that The Physicist is not a fan of baking, but, I guess he's The Physicist, not The Chemist. (The Physicist is a big fan of candy making, but that's more dealing with temperatures, which I guess is more physics-y.) So, if you're making something that needs to puff in the oven, you're counting on a specific reaction of acids and bases, so adding orange juice (an acid), could possibly keep your cake from rising. BUT, adding orange flavor, keeps all your ratios in line, and lets you have that punch of flavor. Also, if you want the flavor of something chunky, like a nut, in something smooth, like a ganache, nut flavorings can be a lifesaver.
I should also mention that a little goes a long way with extracts and flavors, and the potency varies depending on what extract you're using. I tend to add a ton of vanilla to baked goods, but I wouldn't add nearly as much peppermint to anything (peppermint = very strong!). Always give it a good sniff before you add anything, to make sure you know how strong it is.
Subscribe to:
Posts (Atom)