Saturday, December 11, 2010

Baked Brie - A Holiday Must!


Whether you need something to bring to a Holiday Party, just want a festive appetizer, or a romantic dinner for two, a baked brie is always a wonderful choice. All wrapped up, just like a present, it's great for the holidays, or really, anytime. The Physicist and I make this year round, and I just change my stuff for the top (cutting out little leaves in the fall, or flowers in the spring). It's easy enough to pull together on a weeknight, and always dazzles.

You'll need:

1 Puff Pastry Sheet, thawed

1 Wheel of Brie

2-3 Tbsp. of Jam or Preserves or Fruit Butter

1-2 Tbsp. Sliced Almonds (optional)

1 Egg


Preheat oven to 400 degrees

On a cookie sheet (or a foil covered cookie sheet), lay out your sheet of puff pastry, and dock it. Docking is lightly pricking the entire surface with a fork. It's to keep the puff pastry from over puffing in the oven.

With a spoon, smear your fruit preserve in a circle in the center of the dough. I used Marion Blackberry here, but pumpkin or apple butters, raspberry, strawberry, or whatever is also delicious. I try to think "seasonal".


Sprinkle the almonds over your jam circle. You don't need the almonds, but I find them a nice touch. You can also use dried fruit, or nothing at all.


Now, slap your brie wheel right down on top of the preserves. There really isn't a right side up.


Now, wrap up the brie like a present, folding in the corners and sides. So, as not to make a thick pile of dough, tear off some of the corners. You can use them to decorate in the next step.
Once it's all wrapped up, flip it over, so the smooth side is up.
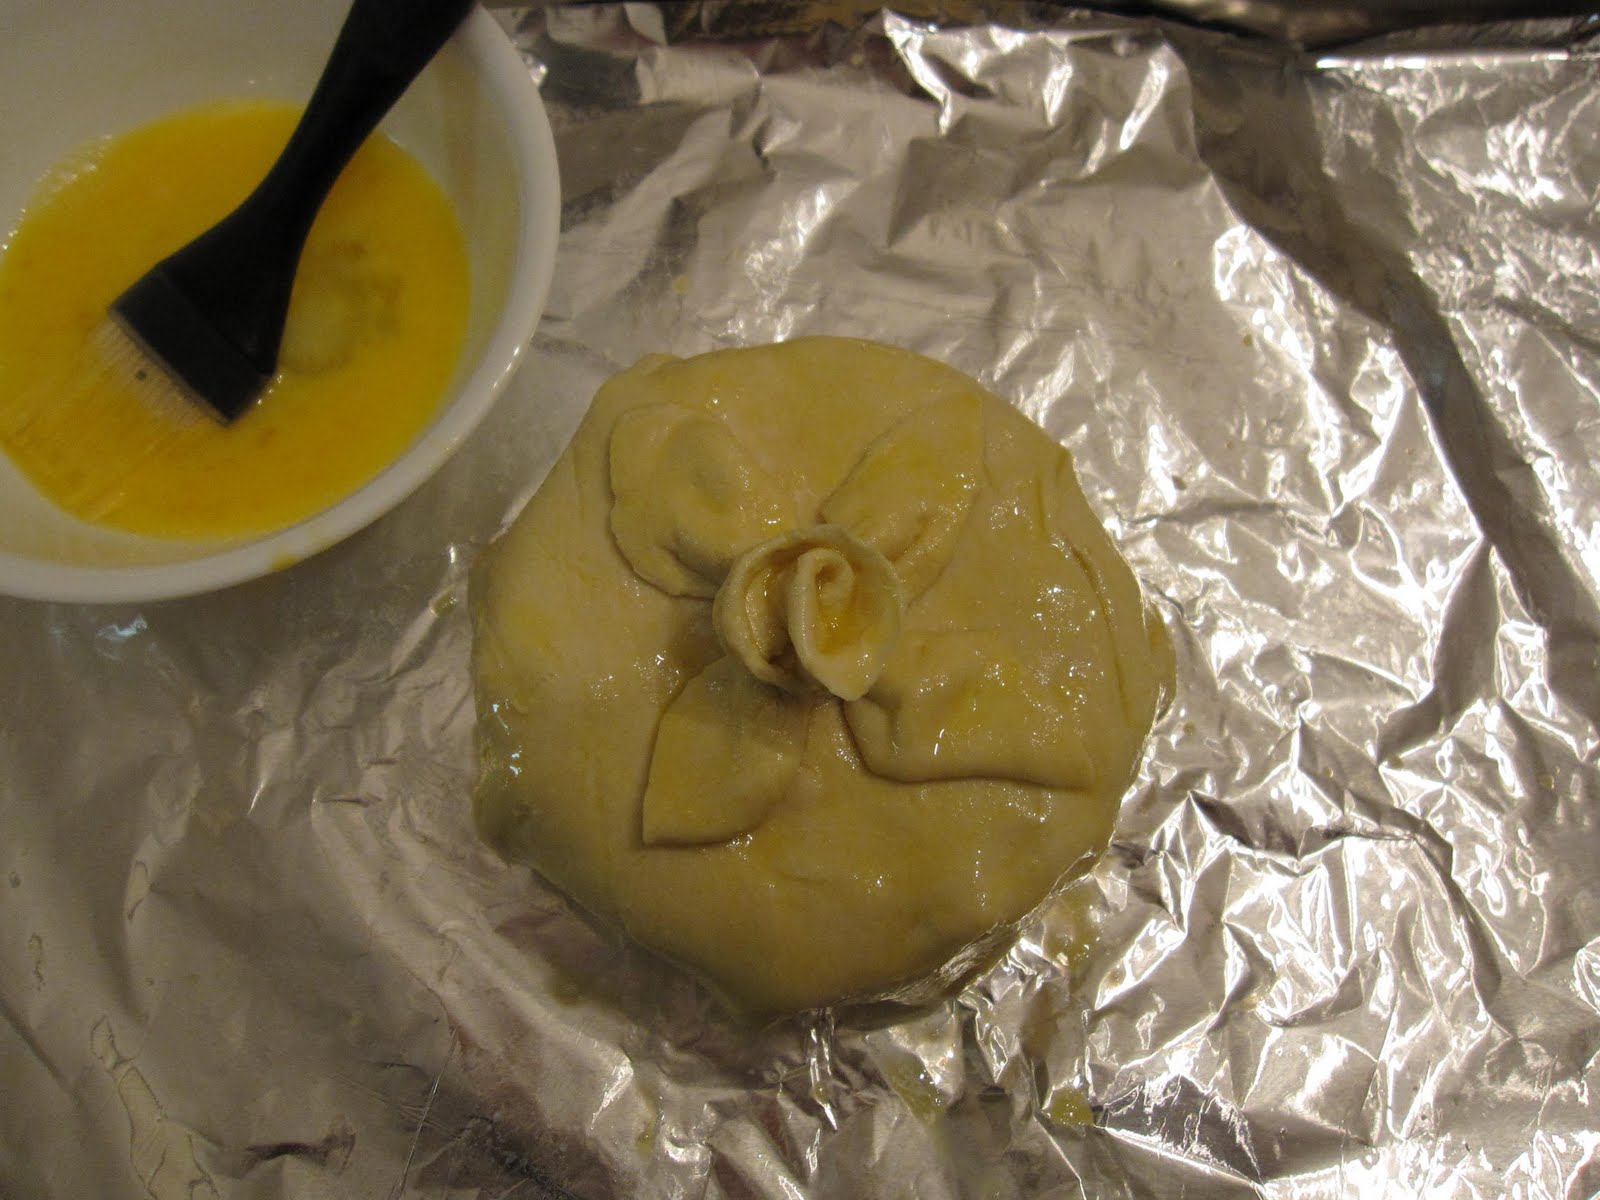


Use your extra pieces of dough to decorate the top. I got carried away, and somehow managed to make a rose. You don't have to do that. Use little cookie cutters, or just make a bow shape with your extra dough, or, if you're ambitious, make some holly leaves and berries. Even a pile of little pieces of dough on top can be lovely.
Beat an egg, and brush it over the top and sides of the pastry.
Bake in the oven for about 20-30 minutes, until golden brown.


While it's baking, start prepping what you dip in it. You can just serve it with crackers, but The Physicist and I like to serve it with fruit. We slice up a Granny Smith Apple, and wash up some raspberries, but any fruit, or bread, or whatever you'd like to dip in cheese is good.
This is what it looks like when it comes out of the oven. All golden brown and lovely. Carefully lift it off with a spatula and set it down on a plate.
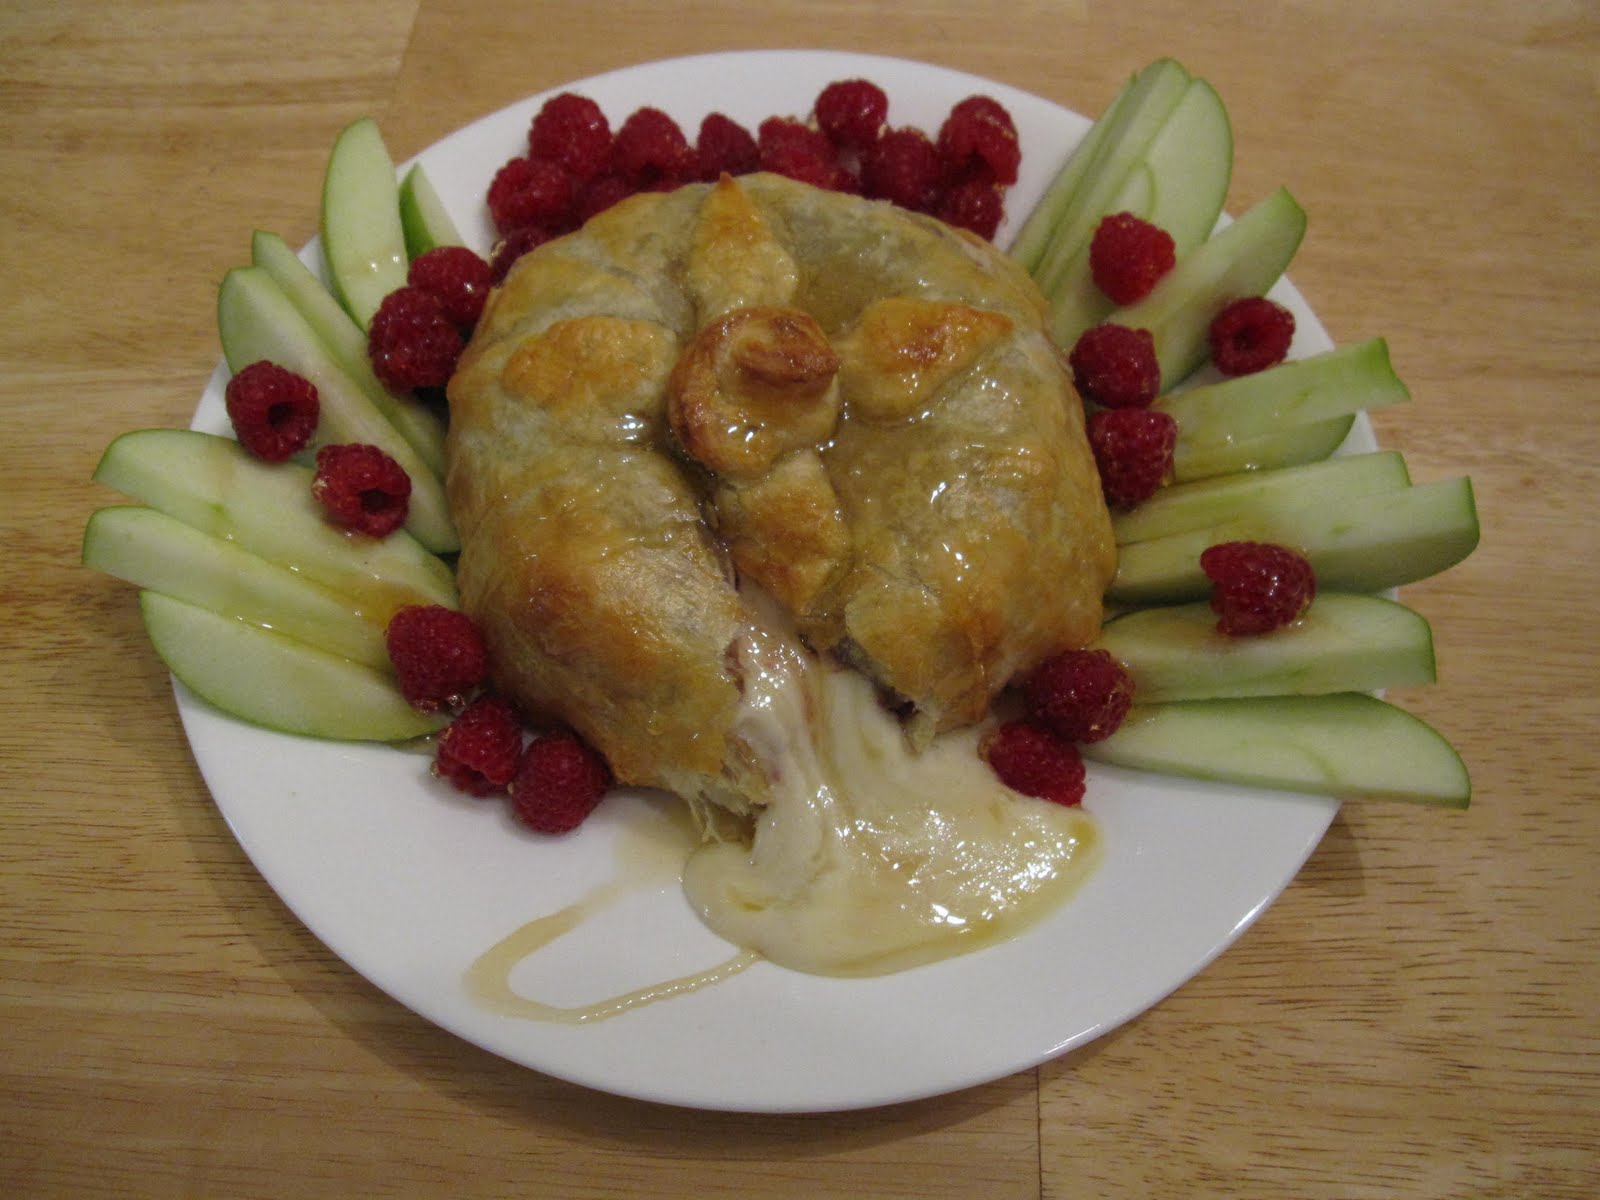
We like to drizzle the whole thing with honey when serving it with fruit, because it just adds another decadent level.
Wait until you're serving it to cut into it, because the moment when the knife goes in, the warm, velvety, melted cheese starts pouring out in it's gooey glory. And no one wants to miss that moment, so make sure everyone is watching.


Wednesday, December 1, 2010

Yeah . . .

So, I didn't make it. My first NaBloWriMo was a bust. I have a camera full of photos, for posts I didn't make. Life happened. BUT . . . I will make those posts. I'm hoping to at least post once a week. I'm hoping that most of those posts will be about food. The Physicist plans on blogging about how to make a roast bird, and I want to share my roasted garlic cream cheese redskin mashed potatoes recipe. December will probably bring some posts about my intense holiday baking and maybe even a how-to on my baked brie! Here's hoping you hear from me soon.

Sunday, November 21, 2010

Why the 6 Inch Cake is Awesome


A 6 inch cake is the perfect size to make cake accessible on more than just special occasions. Unless you have 12 or more people in your family, a 9 inch cake just doesn't make sense. It's too much cake. Even if you have cake every night, you'll never finish the cake before it goes bad. And if you do, well . . . you shouldn't be eating that much cake.
This is the finished cake (see picture). I went a little nuts with the fondant flowers, but I just got caught up in the spirit of Fall. But, back to my topic.


A 6 inch cake is a more reasonable size for families of 2-5 people. Even for larger families, a 6 inch cake may provide more options, by having two 6 inch cakes of different flavors, because there is no way that a family of 12 all wants the same flavor of cake (go ahead, prove me wrong). As The Physicist points out, "it already has a higher frosting to cake ratio, if you're into that sort of thing". Because they are smaller, they are less work to make. It's easier to experiment with flavor combinations when you aren't committing to a giant cake of licorice pineapple (I don't recommend licorice pineapple). And lastly, they're just so darn cute! Seriously adorable!


Here is an aerial shot of my cake, so you can see more of the fondant flowers. I made roses, calla lilies, mums, hypericum berries, and kinda generic little yellow flowers. This was a first attempt at painting the fondant, after I shaped the flowers and leaves, to give them more depth. Ain't half bad, if I do say so myself.

Swiss Meringue Buttercream: Pumpkin Style


I'm usually a huge fan of butter, but smearing your cake with butter mixed with powdered sugar . . . kinda seems gross to me. This is Pumpkin Swiss Meringue Buttercream. It's not like regular buttercream. It's silkier, and lighter tasting, because of the meringue replacing most of the butter. Sure, you have to make meringue, which takes a little longer, but the end result is totally worth it. Trust me.


I use Martha Stewart's Swiss Meringue Buttercream recipe. Well, the Baking Handbook version of it, which is easier to halve for the 6-inch cake (but the link recipe is excellent too). I highly recommend purchasing Martha Stewart's Baking Handbook, because it's an amazing reference. To make the buttercream pumpkin, I added about 1/4 cup of canned pumpkin to the finished buttercream.

This (see picture) is where we left off with the syrup. I have used some of my buttercream as the filling between the cakes.


Now, a word about frosting a cake. I take about a third of my frosting into a separate bowl, to be my crumb coat. "What's a crumb coat?" you ask. Excellent question. It's a first coat of frosting, to make sure there are no crumb in your final coat of frosting. If you've ever painted, think of it as primer. You separate a third of your frosting, because crumbs might get into your bowl. It happens. It's why you're doing this. It doesn't have to pretty (see picture), but this is your chance to even up your sides and smooth out your top. Once it's on, refrigerate the cake for about 10-15 minutes.


After 10 minutes, you'll notice your crumb coat is kinda hard. Good. Then it won't smoosh into your final coat, transferring crumbs. Now it's time for the final coat, and you'll notice how much easier it is to frost because of the crumb coat. If you're going for a smooth look, dipping your spatula in a glass of water really helps. If you just don't think you can manage a smooth look, just frost it like I recommend in the Chocolate Raspberry Cake.

Then it's time for finishing touches. I . . . am not good at piping frosting. Really not good. So I just pipe little circular blobs of frosting around the top and bottom edges. It's easy. It looks pretty okay. And I add fondant stuff to it, so you don't notice how bad my piping is anyway. You'll see that in the next post.


Thursday, November 18, 2010

Syrup: Not Just For Pancakes

Yup, we're back to making the cake. And, yes, the topic is syrup. Not maple syrup (though it could be), but a sugar/water/flavor combo to make your cake spectacular. It's easy, it adds extra flavor, and it keeps the cake moist. Come on, if it adds all that, why wouldn't you put syrup on a cake?

Now, you can make a simple syrup, by boiling sugar and water in some ratio, and adding a flavor (The Physicist does this, because he loves doing things the hard way), but I have a much easier method, with much more flavor.


You will need (for a 6 inch cake):

2 Tbsp. Jam or Preserves

3 Tbsp. Liquid

Saucepan

Pastry Brush

Pictured are some of my favorite combos: Ginger Preserves with Amaretto, Raspberry Preserves with Rose Water, and Lemon Curd with Orange Blossom Water. I like the ginger for fall cakes, the raspberry for chocolate or spring cakes, and the lemon for citrus or summery cakes. You can make your own combination, and just go with what flavors sound great to you.

For our Spice Cake, I'm using Ginger Preserves and Amaretto. Put your jam and liquid into a saucepan, and heat over medium low heat until the jam melts into a syrupy consistency (see first picture).

Cut off the tops of your cakes, and using a pastry brush, mop the top surfaces of the cake with the syrup (see picture).

Now, when you add your filling and stack your cakes, you should have layers from bottom to top: cake, syrupy side of cake, filling, syrupy side of other cake, other cake (see picture).

If you are making a regular sized cake, just double the recipe.
So, next time you're making a cake, give a syrup a try. I promise, you'll like the results.

Wednesday, November 17, 2010

Extracts & Flavorings


I'm going to pause our cake assembly, to take a moment to discuss extracts and flavors. As you can see, I have a bit of a collection (this isn't all of it), and I'm still collecting more. Flavorings can take a baked good or candy to the next level. Homemade marshmallows are fantastic, but homemade POMEGRANATE marshmallows?!?! Out of this world.

Now, you might think, "Why can't I just use pomegranate juice in my candies or cakes? Why the flavor/extract?" Well, baking and candy making are . . . science. Acids, bases, exact temperatures, exact ratios, are all part of baking and candy making. It's kinda funny that The Physicist is not a fan of baking, but, I guess he's The Physicist, not The Chemist. (The Physicist is a big fan of candy making, but that's more dealing with temperatures, which I guess is more physics-y.) So, if you're making something that needs to puff in the oven, you're counting on a specific reaction of acids and bases, so adding orange juice (an acid), could possibly keep your cake from rising. BUT, adding orange flavor, keeps all your ratios in line, and lets you have that punch of flavor. Also, if you want the flavor of something chunky, like a nut, in something smooth, like a ganache, nut flavorings can be a lifesaver.

I should also mention that a little goes a long way with extracts and flavors, and the potency varies depending on what extract you're using. I tend to add a ton of vanilla to baked goods, but I wouldn't add nearly as much peppermint to anything (peppermint = very strong!). Always give it a good sniff before you add anything, to make sure you know how strong it is.

Tuesday, November 16, 2010

Homemade Spice Cake


The next step in making a cake, is, of course, making a cake. Sure, you can just add eggs and oil to a mix, but there is definitely a difference in texture and flavor with a homemade cake. It's denser, and has loads more flavor than anything you'll ever get out of a box. Here is my recipe for a 6-inch Homemade Spice Cake. If you want a regular sized cake, just double the recipe.


You will need:

1 stick Softened Unsalted Butter (1/2 cup), plus some for the pans

3/4 cup All-Purpose Flour

3/4 cup Cake Flour

1 tsp. Ground Ginger

1 tsp. Cinnamon

1/2 tsp. Allspice

1/4 tsp. Ground Cloves

1/2 Tbsp. Baking Powder

1/4 tsp. Salt

1/2 cup Sugar

3/8 cup Dark Brown Sugar (I use Muscovado Sugar)

2 Eggs

2 tsp. Vanilla Extract

5/8 cup Milk

2 six-inch cake pans

Parchment


Preheat your oven to 350 degrees. You're going to need 6-inch parchment circles, and yes, you can buy them, but they usually aren't in grocery stores. Regular parchment CAN be found in a grocery store, and making a circle is pretty easy. Set down the pan on the parchment, and using a pencil, trace the bottom. Then just cut it out, inside the lines, so there's no pencil marks on your circle (see picture).


Butter your pans, set in your parchment circles, then butter the parchment circles. You can then flour them if you want, but I usually don't. I know I'm going against everything you've ever heard, but really, the cakes turn out fine.

Sift together your flours, spices, baking powder and salt (see picture). Sifting is important. It does make a difference. For some cakes I sift twice, but since spice cake doesn't need to be a super light texture, once is fine.

Using an electric mixer, cream together your butter and sugars. Make sure the brown sugar gets fully incorporated, since it has a tendency to make clumps. Mix on medium low for about 5 minutes.


Set your mixer on low speed, and add the eggs, incorporating the first before adding the second, and then add the vanilla. I like a lot of vanilla in my baked goods, which is why the recipe asks for two teaspoons. I'd add a tablespoon if I could, but The Physicist thinks it's "too much".

Okay, time to add your dry ingredients and your milk. Add your dry ingredients in thirds, alternating with the milk, beginning and ending with the dry ingredients. I don't know why you do this, but it works. Mix until fully incorporated.

Split your batter evenly between your two pans, and using an offset spatula, smooth the tops. This helps for even baking, and smooth cake tops when they're done.

Bake your cakes for 35-40 minutes, or until a toothpick inserted in the center comes out without batter on it (comes out "clean"). When I first started baking, I'd worry if a crumb stuck to the toothpick, because that wasn't "clean", but crumbs are okay.


Let cool in the pans for 10 minutes, then get 'em out of the pans, and let them cool completely on a cooling rack. Once completely cooled, you can frost them, or you can wrap them up tightly in plastic wrap, store them in the fridge, and frost them tomorrow. Which is what I'm doing.